Dips Explained - All You Need to Know About Dip Belts and Using Them for Pullups
Remember that song from the 90s with the lyrics: When I dip you dip we dip? Well, if you didn’t, you do now. And the chances are, you’re singing it. Good. Now that I’ve got your attention, let’s talk about dip belts.
If you’re a trainer who regularly performs dips, pull-ups, and other functional strength training exercises, you need a weighted dip belt.
Dip belts like our Rubberbanditz Weighted Dip Belt with Chain add the perfect amount of extra weight to your reps, encouraging superior muscle building, and upper body strength development.
Are you curious yet? We don’t blame you. Here is how adding a dip belt to your regime can take your workouts to the next level.
What Are Dips and Why Are Dips Good?
Simply put, dips are compound movements and a fantastic addition to your workout regime. They require you to use multiple joints at the same time, while also encouraging your body to stabilize itself to prevent you from swaying wildly. This powerful upper-body movement is as toning and beneficial for your physique as pull-ups are, as long as you perform them correctly and appropriately.
Dips are functional exercises, which help you improve your physical movement patterns. They may also be able to enhance your quality of life by relieving aches and pains during day-to-day activities. Resistance training can be fantastic for building your strength and adding lean muscle to your body composition, but it doesn’t always exercise your smaller muscles to the same degree.
Functional bodyweight exercises like dips train your muscles to work in harmony together, making every movement you make more efficient. This has the benefit of reducing the likelihood of pulling or tweaking anything while you exercise when your balance is better, and you don’t overcompensate on either side.
Ultimately, bodyweight exercises will encourage a broader range of motion and protect the integrity of your joints. This is especially true when you compare dips to heavier lifts with external weights, which could cause potentially damaging compensation if you aren’t careful.
What Are the Benefits of Dips?
Dips have several awesome benefits for your body.
First, they stimulate muscle growth, enhancing your strength, and boosting your performance in other lifts as well. One notable advantage of these exercises is that you can do them virtually anywhere, be it at the gym, at home, or while you’re on the move. It’s also extremely satisfying to be able to lift your full body weight using your arms alone.
If toning up is the name of your game, dips can help in this regard too. These exercises can supercharge your metabolism and incite body composition changes, making you leaner and fitter simultaneously. Since you’ll be recruiting muscles from all over your upper body at the same time to perform these compound movements, your body will need to work harder, burning more calories in the process.
You’ll probably already know that it takes more energy for your body to build and maintain muscle than it does to store fat. Dips can add additional muscle to your frame, which is inherently better at burning calories and keeping fat at bay. The result? A leaner, tougher, and stronger physique that lasts.
How Do You Do Dips at Home?
If you’re just starting out with dips, you’ll be glad to learn that you don’t need piles of expensive equipment to get started. Beginners only really need an elevated surface for starters. Many people find a set of bodyweight training parallettes to be a suitable starting point. You can also try using two benches or chairs.
If using a bench or a set of parallettes, they should be sturdy and at least twice as wide as your shoulders. Your bench needs to be at least 14”-16” off the ground to allow you to dip properly and enjoy as much lift as possible.
Here are some tips and tricks for performing dips at home.
- Focus on your grip. Grip is the first important motion for this exercise, and it will determine your upper body power and endurance. Grip your base (the edge of your bench) firmly while you are still seated on it.
- Get into the right position. You now need to leave the comfort of your bench and position yourself so that you’re sitting on ‘air’. Square your feet around shoulder-width apart beneath you. Now, lift your butt off your bench and pretend that you’re sitting on an imaginary bench right in front of the real one (stay with us here!) Your arms should be properly gripped, and your shoulders squared while you do this.
- Get dipping! Slowly dip yourself down by lowering your entire body in the position described above. When you lower your body, ensure that your elbows are pointing directly to your back. If your elbows point sideways from your body, this will reduce the force exerted on your triceps and make your dips less effective. Keep your shoulders straight, your legs and knees straight, and your chin up while you dip.
If you’re a beginner, you will need to gauge how far you can dip your body by doing a few test exercises. Try a few short dips to warm your joints up first and get your technique on point.
- Lift yourself back up. As you are about to finish a dip, you need to lift your body back up properly. You can do this by straightening your arms and lifting yourself up slowly.
Try and isolate the movement to your arms while keeping the rest of your body still.
Speed is not important for this particular movement and can actually be detrimental. Your goal should be to slowly exert pressure on your body and muscles. Your shoulders will be hard at work during this phase of your dips, so ensure that they are straight and firm. You want to avoid moving the shoulder out of its normal range of motion, which can cause overly stretch or strain your ligaments.
Why You Need a Dip Belt?
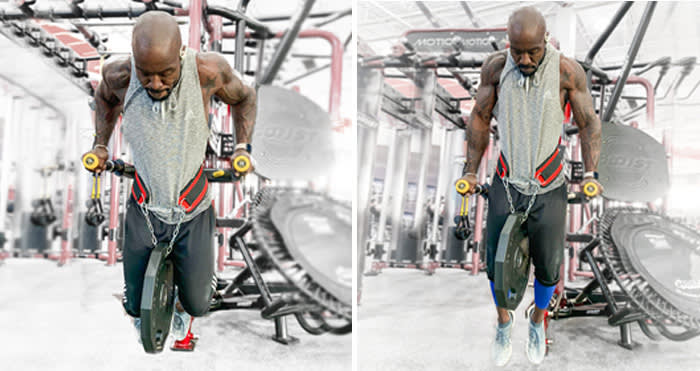
Once you’ve got a handle on doing basic dips, your next step forward should be to add difficulty to your reps. This concept of ‘progressive overload’ is what leads to strength gains and is achieved by slowly but incrementally increasing the amount of weight, intensity, or amount or reps performed in your workouts. Dip belts provide an easy and intuitive platform for increasing the difficulty of your dips.
We suggest using your own body weight to do dips. However, once it becomes less challenging to lift yourself up, adding a dip belt to your training will provide the extra weight you need to further challenge your muscles and bolster your workouts.
A dip belt works in much the same way as a classic weightlifting belt that wraps around the lower part of your torso. The primary difference between the two is that the dip belt has a chain or a strap around the front to which you can attach your preferred weights.
Many fitness fanatics will tell you why you need a weighted dip belt for various reasons and why it is a must-have piece of equipment, but there are a few things you should know before you start using one yourself. You need to test how different weights affect your belt and the pressure on your torso and back. You’ll also need to ensure that you have the right weight, are wearing supportive footwear, and are observing good form if you want to perfect your workout.
How Do Dip Belt Improve Your Dips?
Weighting your dips will amplify the benefits of these exercises in so many ways. A dip belt will improve your dips by:
- Helping you to build a bigger chest and arms than simple body weight dips alone
- Boosting your bench press total
- Enhancing your upper body strength
- Assisting you to switch over from endurance training to muscle building
- Providing you with a wider range of motion than other similar pushing exercises
- Allowing you to raise the intensity of each dip as you see fit using weights that correspond to your current level of fitness and ability.
- Increasing the difficulty of your pull-ups and chin-ups
How and Why You Should Use a Dip Belt for Pull-Ups?
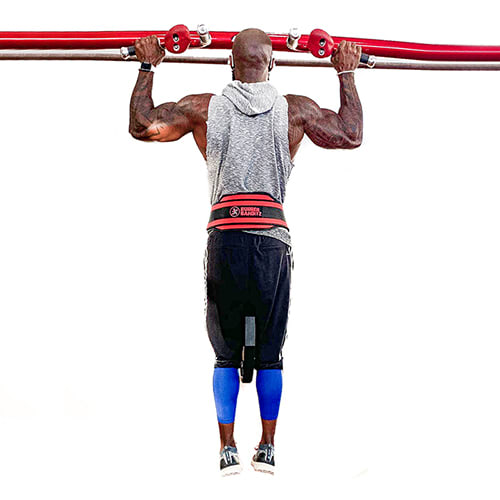
Did you know you can use a dip belt for pull-ups? Many fitness enthusiasts add dip belts to their pull-up routines to better target their back and biceps.
To perform a standard weighted pull-up, first put on your belt and attach your desired weight, which should swing between your knees. Grip your pull-up bar. Keep your hands shoulder-width apart with your palms faced away from you. Completely extend your arms into a dead hang position, then cross your ankles and raise your feet until your knees bend at a 90-degree angle.
Pull the weight of your body upwards through your elbows until your chest reaches your bar. The ideal posture for a weighted pull-up will come from squeezing your shoulder blades backwards and downwards in your upper position until your chest reaches your pull-up bar.
Get Dipping
Dip belts will give your workouts the extra muscle-building power you’ve been looking for. Our Rubberbanditz Weighted Dip Belt with Chain was been designed to withstand heavy loads by adding nylon-reinforced seams and straps for security. Our dip belts’ chains and welded D-Rings are extra thick to support up to 275 lbs of weight and boast twin nylon padded layers designed to support your hips through the full range of motion.
Our tough and resilient belts are ideal for tricep dips, weighted pull-ups, powerlifting squats, and a myriad of other strength training and weightlifting exercises. They’re also ideal for use by CrossFit enthusiasts, Calisthenics Bodyweight training fans, and Powerlifting athletes.
Best of all, our functional strength-building belts come with a lifetime 100% satisfaction guarantee to ensure they meet your fitness needs. Whether you’re a beginner or an advanced strength trainer, our weighted dip belts will help kick your workouts up a notch and give you an easy way to challenge yourself and measure progress.


